This site will update everyday about How To Learning English, How To Learning Coding, How To Learning Vocabulary, How To Learning English Fast, How To Learning A New Language, How To Learning English Writing, How To Learning English Grammar, How To Learning English Speaking, How To Learning Typing Fast
By Hatice Bayramoglu In this tutorial, you will learn how to create this painting of a fox. This tutorial will show you techniques for coloring, shading, and outlining.
By Hatice Bayramoglu In this tutorial, Hatice will show you how to paint a winter bird scene. This tutorial will go over some basics of painting as and show you a technique for painting snow.
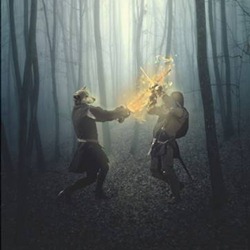
By Michael Vincent Manalo Learn how to create a fantasy-inspired photo-manipulation of two warriors: a werewolf wielding a burning sword and a human with a regular longsword. You will learn how to turn a human into a werewolf, create a flaming sword using a few brush strokes, and how to use adjustment layers to alter the color of the image.
Author : Http//www.pixelraves.com. A colleague of mine bought me this elephant figurine during his holiday trip. I felt that this would be nice if its illustrated out in vector. Hence, I gave it a try, and at the end, I came up with the vector illustration of the elephant, and also a wallpaper too. Wallpaper�??s size is 1600 x 1200. Both are free for download.
Learn how to create abstract 3D shapes, stunning star flares, and more! This Photoshop tutorial will show you how to create a high-res poster in detailed steps from start to finish. You’ll need Photoshop CS5 Extended to follow this tutorial.
In this tutorial you'll learn how to use different blending modes to professionally blend images, you'll see different ways of adding lights and shadows and discover the way how you can add realistic fire to your pictures. Let's get started!
Retouch your photos with these five easy photo effects! These Photoshop video tutorials will show you how to create some of the most popular photo effects using professional non-destructive editing techniques. You'll need Photoshop CS4 or newer to follow these tutorials.
Be mesmerized by the fantastical works of Fabio Meschini. This interview with this talented visual artist will take you to a whimsical world full of vivid details and amazing images. His vision is truly inspiring and uniquely creative. Read on and get to know more about Fabio!
In this tutorial we are going to learn how to make a poster inspired by WWF creative posters. With a couple of images, we will create a beautiful realistic typography with natural theme. We will learn how to blend these images together to make them become a nice one. This tutorial is full of tricks and tips to manage layers and your images.
This tutorial will take you through the steps of drawing and painting a street in Venice. Part I is the drawing, Part II the blocking in, and Part III the final painting and detail. To see More this Tutorial click here
This may feel like a Nike ad (and I suppose technically it is an ad), but it's also a based-on-a-true-story-hollywood-motion-picture waiting to happen...
This inspiring short film is part of an ad campaign series called Make THE Difference for the TMB Bank, but it's also a true story—here are the facts:
Back in 1986, a group of Thai kids were so inspired by the '86 FIFA World Cup, they decided to take up the sport.
But there was a serious problem—the kids lived on the Southern Thai island of Koh Panyee, a tiny fisherman village built on stilts with no room for soccer fields, let alone soil as used in the typical soccer field. So the kids built a floating soccer pitch from scraps of wood and fishing rafts, and are now one of the most successful youth soccer clubs in Southern Thailand.
It doesn’t take a wealth of graphic complexity to produce an image charged with meaning. In this design, self-employed artist Tom Starley uses basic colours, shapes and brush strokes to create a well balanced, euphoric image with a hint of the fetal about it. This isn’t a technically complex piece – the original photograph does most of the work, but its graphic accessories enhance the emotion that is hinted at in the original.
The techniques in this tutorial will teach you how to subtly use Overlay effects and Selective Color to change the mood of your image. You’ll also learn how to place shapes to aid visual abstract design, how to use brushes to aid movement through the composition, and how to add depth to the foreground. We’ll also throw in a great trick to mask hair.
Step 1 First off, download the project files from the right of this article. Open the In The Moment brush set and double-click to install it. You’ll need a model shot, preferably one with a limited tonal palette. I’ve gone with a nude from iStockphoto that you can buy here: bit.ly/8XssvN.
Step 2 Double-click the photo to unlock it. In Photoshop, create a new layer beneath it. Fill this layer with white. Simple.
Unleash the power of masking…In these video Photoshop tutorials you will learn about masking techniques with the use of adjustment layers and selections, how to isolate and remove objects to produce creative compositions.
Welcome to another Photoshop tutorial. In this tutorial I will show you how to create a building hit by a meteorite. I tried to simplify it so that less advanced users can follow it. I’ll show you how to create a realistic smoke trail and a meteorite using only Photoshop filters and custom brushes. All stock images used in this tutorial can be downloaded for free. Hope you like the final result.
The first thing you need to do is to open the Empire State stock image in photoshop and duplicate it. Name the bottom one ORIGINAL and the top layer TOP-LESS. Now you have to erase the top part of the building on the TOP-LESS layer but leave the sky visible. The easiest way to do that is using the Clone Tool (S) and the Patch Tool (J).
Start with the clone tool and hide part of the building as shown above. Use the sky surrounding the building as cloning source. When you’re done with the Clone Tool you will see that some edges are not well blended. That’s because this tool don’t blend the luminosity. To solve that problem use the Patch Tool.
The patch tool is similar to the clone tool but it also tries to match the luminosity of the source and destination so that you get a seamless blend.
Step 2
When you have the Patch Tool selected, activate the Source option on the upper settings bar and select the area that contains the miss-blended areas and drag the selection over a clear area of the sky. When you release, the patch tool will replace the area with the sky sample where you dragged the patch.
If you don’t know how the Patch Tool works watch this great video found on You Tube.
Step 3
After hiding the indicated areas with the Patch Tool, this is how the image looks. We are still working on the TOP-LESS layer.
Step 4
As you see on the picture above, the smooth area must be fixed. We will make it rougher using brushes and a layer mask.
Create a Layer mask for the TOP-LESS layer. Load Photoshop’s default brushes set. Use the rough brushes in this set on the layer mask using black to reveal parts of the ORIGINAL layer below.
Step 5
Once you have the bottom part of the building ready, turn off the visibility of the TOP-LESS layer to reveal theORIGINAL layer. Get the Pen Tool (P) and trace the contour of the top part of the building using paths. When your done, convert the path into a selection, go to Edit>Copy and then create a new layer above the TOP-LESS layer and paste with the shortcut Ctrl+V. Name this layer BUILDING-TOP. Select the new created layer and rotate it about 5 degrees.
Step 6
Now you will start destroying the building. This operation has to be done manually with the Lasso Tool (L). Select theBUILDING-TOP layer and select small size parts of the building. After making a selection right-click and choose Layer Via Cut because you must have these small pieces of debris on a separate layer in order to rotate them. Cut multiple pieces as you see on the image below. I grouped all the layers containing the small pieces of debris.
Step 7
This building needs a more rougher look. Create layer mask for the BUILDING-TOP layer and use the same procedure as on step 4 to create some rough edges. Again, paint with black on the layer mask so that you hide parts of the building. Once I made the rough look using brushes on the layer mask I used a grunge concrete texture with OverlayBlend Mode to create more damage effect.
Step 8
Download the Media Militia particles pack and open Media_Militia_Particles023.jpg. Scale it down if necessary and paste it over the building to add more debris. I put it in the same group as the other debris pieces made on step 6.
Step 9
Now it’s time to make your meteorite. As I said, you can create it from scratch using only filters. I discovered this technique one day while messing around with filters. Here is how you do this.
Create a new layer above the other layers and name it METEORITE. Select the Lasso Tool (L) and draw by hand a roundish shape. Try to avoid straight lines cause rocks usually have no straight lines. When you have a selection that you like, make sure your background and foreground colors are set to Black and White and go toFilter>Render>Clouds and then Difference Clouds. Try Difference Clouds a few times. If you are not happy repeat the process from Render>Clouds. Try to get a mixed surface with black and gray.
Step 10
When you’re satisfied with how the rock looks after applying the clouds, go to Filter>Sketch>Bas Relief. Set Detail to maximum, Smoothness to 2 or 3 and try the different light directions. I chose Right.
Step 11
Now that you have the rock, you have to turn it into a meteorite. For that you must create a layer style so open the layer styles window by double clicking on the METEORITE layer.
Meteorite layer style
Keep in mind that this layer style might not look exactly the same on your meteorite because it depends on the amount of black and white areas you have on it. After applying the style try changing the Contrast of your meteorite using Levels to increase highlights and see how it looks. Also try different blend modes for different results.
Inner Glow
Bevel and Emboss
Gradient Overlay
You can also apply a Pattern Overlay with a rock texture and Overlay Blend Mode if your meteorite needs more texture.
After applying this layer effects you should get something similar to the image below.
Step 12
Select the Smudge Tool and smudge one end of the rock in order to create a motion effect.
Step 13
In order to create the smoke trail you will have to create a custom brush using the Brush Preset Editor. Get a soft brush slightly bigger than your meteorite and press F5 to open the brushes window or go to Window>Brushes. This is where you have to create your smoke brush.
First, go to Other Dynamics and increase opacity to about 40%.
Next, activate Texture and choose the Clouds pattern locate in the Pattern set (it comes with Photoshop). Check heInvert box next to the pattern thumbnail, increase scale to about 90% and play with the sliders until you get something you like. Also try enabling/disabling Texture Each Tip.
The Mode option depends on the background where you will use the brush, I used Multiply here but you can try the others. Just try to get the smoke to be fluffy and smooth. You will have to create two smoke trails. One lighter and one darker.
Step 14
Use the same smoke brush you created and use a darker gray to create another smoke trail. This time you can increase the size of your brush a few pixels and try a different Mode. Create the black trail above the lighter smoke layer. On a new layer, stroke along the smoke trail using orange and set the Blend Mode to Overlay. That will be the light left behind by the meteorite.
Step 15
Open the explosion stock image and scale it down as in the image below. Change the Blend Mode to Screen and use aSoft Eraser or a Layer Mask to hide unwanted edges.
Step 16
Open Media_Militia_Particles013.jpg (ignore the text in the image) and erase the middle part because the concentration of particles is too big there. Only leave the outer ones. Place them on the exit and entry points of the meteorite.
Step 17
Use the Marque Tool and create a selection the size of the damaged zone and add some black and white clouds. Set the Blend Mode to Hard Light and decrease Opacity to 45%. Duplicate the Layer and change the Blend Mode from hard light to Soft Light and increase Opacity to 75%.
Step 18
The last thing I did was to add some lights. Use a light orange color and Blend Mode- Vivid Light. Change opacity if the effect is too strong.
Post Editing
The scene is ready but it can look much better making some general adjustments. I always include a post editing step on my creations because I always end up with a better result.
Step 19
Gradient Map
Select the entire canvas and go to Edit>Copy Merged. Create a new document and paste the image. Add a Gradient MapAdjustment Layer, set the layer Blend Mode to Overlay and decrease the Opacity to 30%.
Exposure
You have to adjust the general exposure of the image and make it brighter. I usually use Levels but this time I decided to change. So add an Exposure Adjustment Layer and use the settings shown in the screenshot below.
Step 20
I wanted to give the image a bit more of depth so I used some more particles from the Media Militia pack and added some blur to them. I also added a subtle vignette effect. You can add some motion blur to the meteorite and other parts of the image if you want.
Step 21
The last step is a general light shift. The light source in this image is on the left side so I wanted to enhance that. As always, I used the Lighting Effects filter.
Select the top most layer on the palette and press Shift+Ctrl+Alt+E to create a stamp of all visible layers. That will create a new layer that you can edit without affecting the other layers. Go to Filter>Render>Lighting Effects and use the settings shown in the image below.
Final Result
If you liked this tutorial, please save it on Delicious or Stumble it, or share it on any network you use.